Novation A-Station remote panel for the Mackie C4

Hello everybody :slight_smile: ,

so here is my first version of a Novation V/A-Station remote panel for the Mackie C4 and i would like to share it.

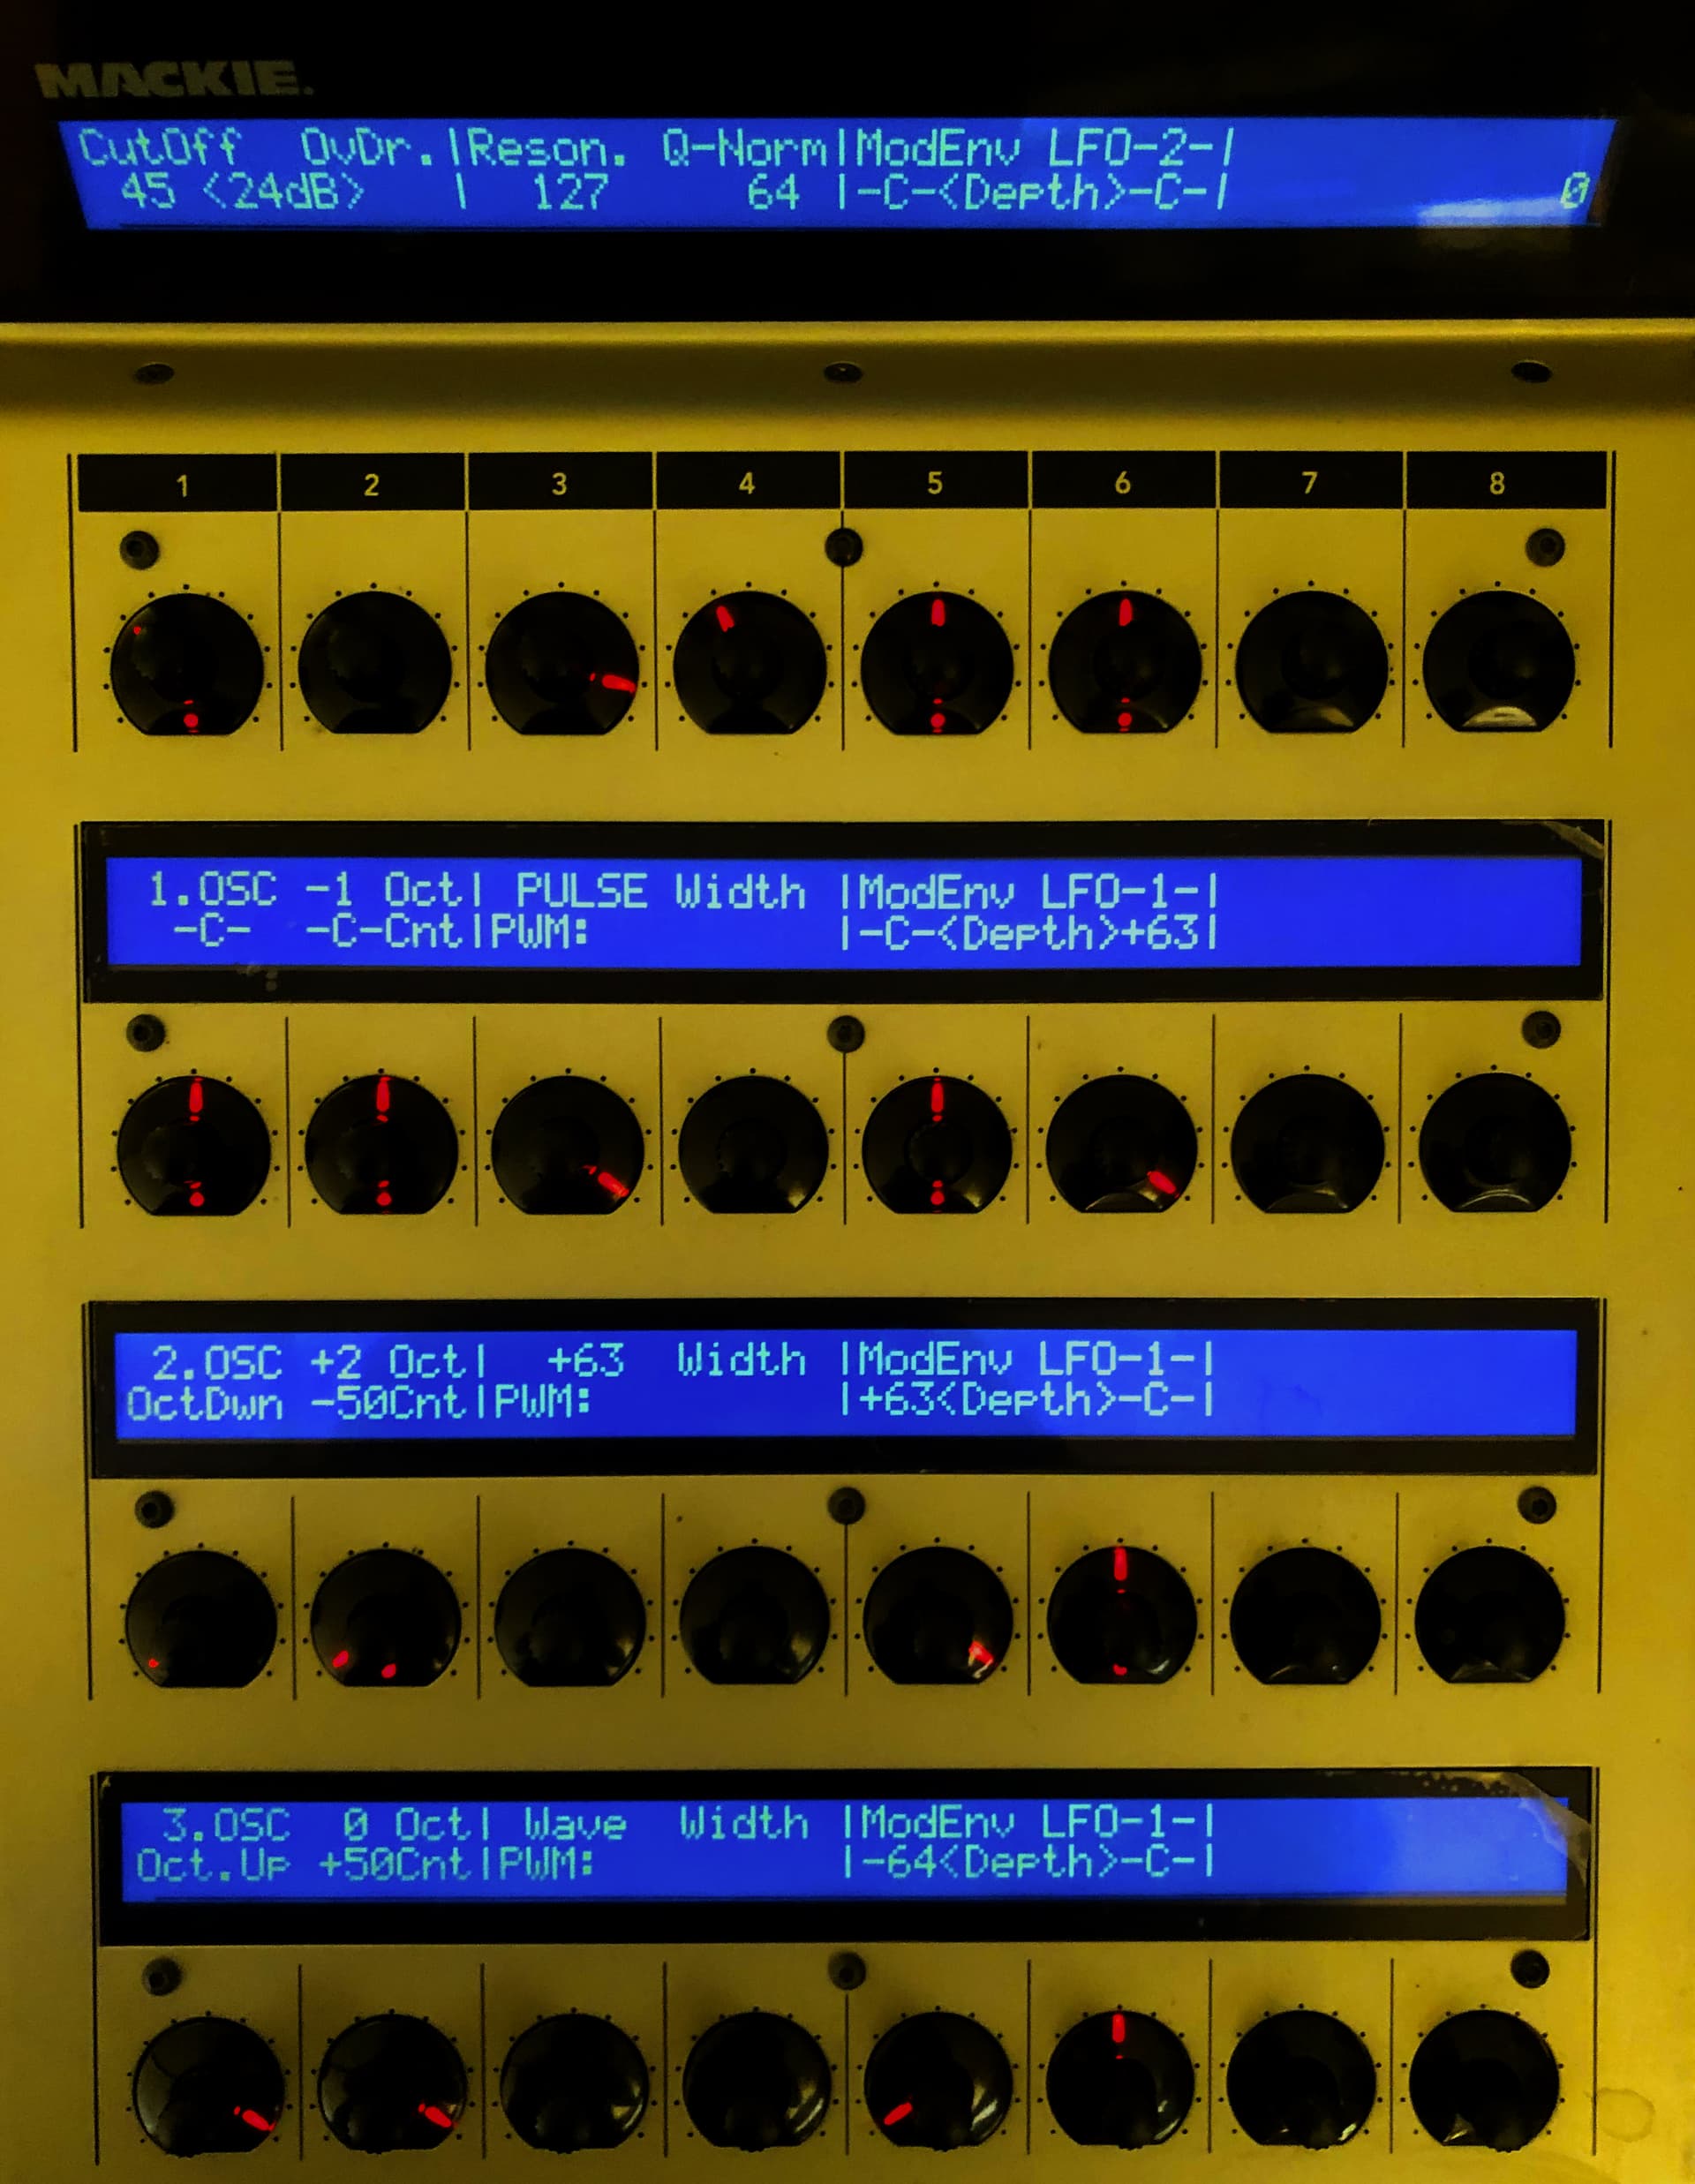
The aim of the project is to give Mackie C4 owners the possibility, to create things on their own. This midi controller is not well documented and if your software does not support it, you will be doomed, especially if you are on Mac OS. On release, there was once a software called ‘Total Commander’ with which you could do remote panels easily, but this software has several downsides. It does not work anymore on any newer Mac OS (i think Intel-Macs where the last ones). It does not support bi-directional work, so a panel cant react to program changes of the hardware for example. It also supports only one-time actions, so you cant use the push and turn function of a Vpot together, only one of these per Vpot and last but not least, it only works with a PC of course. . This midi controller is capable of so much more. With Bome MTP and this project, you will have full control over it AND are not limited to these restrictions. In combination with a Bome Box, you dont even need a PC anymore or do a Live act, only with your hardware.

This early version has only 32 Vpots, because before i move to the next page for another 32 Vpots, i want to solve some problems first. Once the first page is finished, a user can create a panel for another synth on his own, because this project will deliver any relevant infos and documents to do so.

I will post any future updates for this panel in this thread.

So for the remaining last Vpots on the first ‘page’ of the panel, i would like to have a gimmick for the LFO Speed/Rate. The A-Station has a small LED for it. This LED blinks in time at the speed of the LFO. I would like to do the same on the Mackie C4 with MTP. How would you approach to do this? It needs a timer that is bound to the amount of the LFO speed and triggers a on/off state for the led(segment).

Thanks in advance, :slight_smile: . A better introduction to this topic, will follow later.

Mackie C4 remote panel for Novation A-Station v01…bmtp (60.8 KB)

Hi, we would need to capture the value of the global variable that contains the current LFO speed and then set a repeating timer at a calculated interval based on that value. Is the LFO speed represented by a 128 (7 bit) or 16383 (14 bit) CC. An example of a given value and associated blink rate would also help to figure the calculations needed.

I don’t see anywhere in your project where you document the global variables that you are using and what they are used for. I guess you are tracking them somewhere else.

Steve Caldwell
Bome Customer Care


Also available for paid consulting services: bome@sniz.biz

Hi Steve :slight_smile: ,

LFO speed is represented by 7bit.

LFO infos i got from the manual:

LFO 1 and LFO 2:
Waveform Sample & Hold / Tri / Saw / Squ
Speed 0 Hz – 1Khz
Delay Fade In 0 – 5 Seconds
LFO Sync Internal – MIDI Clock

Speed is set by CC 80 and range 0-127 for the NON-SYNC LFO1 SPEED, which is the one i want to experiment first. I know this can only be a approximation, but i would like to have it anyways. I will experiment to come close to the hardware :smiley: ;). The original can only blink and has no dimming. Full on or off so to say.

I am sorry, but they are inside the preset ‘Outgoing Values from A-Station’ in a Translator that is the first in the list, called ‘Novation A-Station Global Defs’. Maybe not the best place to be :slight_smile: . Currently there is no global for the LFO speed, but g6, g7 is the desired one. Thanks for looking into this.

OK, so what should the blink rate be at 1Khz? and what note number do you send to turn the LED on and off?

Steve Caldwell
Bome Customer Care


Also available for paid consulting services: bome@sniz.biz

Sequenz 01_1
Sequenz 01_2

Zero is off and 127 is so fast, you cant really tell if it is blinking or just on.
For the smaller gif, i did cut off the ‘turned’ off part, but you can see how long the duration for the ‘on’ part is. The ‘off’ part has the same duration.

For the note number, it would be the best to use aany LED segment of the Vpot Ring. Best would be the pdot of the ring (the one that is on the center bottom 40 in hex).

OK, I’m not going to mess with your project so I attached and example.

This works with the first VPOT of MCU controller.
I calculate the CC value and send the CC 80 in translator 0.0.
I call Perform ‘Blink’ in that translator which is translator 0.1.
I used g6 to store the value

Perform Blink (Translator 0.1) calculated the blink rate and calls a repeating timer. If the blink rate is less than 100 ms or over 1000 ms, then I call Perform Stop (translator 0,2) and otherwise do nothing with the timer. If it within range it starts a repeating timer at the currently calculated rate.

The timer, actually turns on and off the LED toggling it (using global variable g7).

Blink stop (Translator 0.3) kills the timer and calls Perform ‘LED’ with the parameter for either on or off.

Translator 0.4 either turns off or on the LED when the timer stops.

I use aliases instead so that if port names change I just re-assign the alias.

You can learn more about aliases from this tutorial.

Blink-From LED value-example-2025-04-11.bmtp (2.6 KB)

Steve Caldwell
Bome Customer Care


Also available for paid consulting services: bome@sniz.biz
1 Like

Thats great, i will try that out. Thanks to your help, today i did found out how the meter leveling works on the Mackie C4. It was the last and only thing, that i could not setup on the Mackie C4 for years. Your patience with me and explaining the hex>binary>bit thing, helped me to understand the midi-implentation of the MCU and how to activate that meter leveling. Cant tell you, what a relief that find out is to me. This project was a good choice to learn these things and how great MTP is.

I wish you a very nice weekend. Again, many, many thanks for all that help and i will give my best to implement the LFO blinking :smiley: :blush:

1 Like

So i have included your ‘blink’ solution into my project. It is quite a nice gimmick i must say :slight_smile: . Sadly i cant sync it, mainly because the scaling is linear, but the LFO Speed range is not. With a setting of 350ms in your project for the speed range, it is working fairly good at mid to end settings, but anything below the half (range) of the rate is waaay off. It would need to blink once in intervals of several seconds, which is not possible with this setting. We need kind of a exponential curve to come close to the original. The LFOs can be synced to a midiclock. So i think the Rate range can be calculated. I am really not good in this. I mean knowing how long a delay should be i.e. for a triple note with 120bpm, but there are tables for that, from what i have seen.
I need to tweak blink project a little more, it should turn off completely after 5min., if there are no incoming messages, otherwise the displays will not turn off. It counts like a action for the device :smiley: and it should turn on again after incoming messages :wink: . I can configure the screensaver for the displays with:
F0 00 00 66 17 0B and then 00-7F for duration time. Default is 15minutes with 0F. I will try to bind the timeout for the LFO blink to that parameter. The last thing i need to do, is to alternate between lamp and the actual LFO Rate value showing/pointing with a LED ring segment. So the Vpot Ring is never completely off and instead pointing the value, this makes the effect even more ‘stylish’.
Wrap-Manual_1
But then, it will be perfect :smiley: .

We could mess with the scaling but it would probably be hit and miss. The best thing I would suggest is setting some MIDI values and then hardcoding the rate from there.

Like:

if g6==64 then tt=40
if g6 ==90 then tt=50

as crude example.

Even at that, there is no guarantee that LED will go on on the downbeat.

At a tempo of 120 beats per minute (BPM), a quarter note (1/4 note) has a duration of 500 milliseconds (ms). This can be calculated by dividing 60,000 milliseconds (one minute) by the tempo (120 BPM). For other time divisions, you can adjust the duration accordingly. For example, an eighth note (1/8 note) would be 250 ms (half of 500 ms) and a 1/128th note would be 16 ms.

If the MIDI clock is putting out clock pulses then we could use those and divide by 24 to blink the LED to have it blink once per quarter note.

Steve Caldwell
Bome Customer Care


Also available for paid consulting services: bome@sniz.biz

I will keep that in mind. Possibly the best to do this, is when i setup the page, where all these sync functions can be set. I dont know if the A-Station has a own midi clock, will consult the manual again :smiley: . But i know you can sync to a external clock, like DAW etc.

I has mentioned the Level metering and it is really cool to have that. You might think, those levels for output levels are inaccurate and slow and this is true, but to be honest, i think they where there for something different. I can use 16 channels. Four per display or two full rows. What i want to do, is to take the level meters for the matrix, where you choose things like Aftertouch, Velocity, Breath and how much impact they have on a patch/sound. If the metering is active it expects aftertouch values to work with. The Aftertouch message is divided into two single hex digits. The first (left) number tells which channel to use. Channel is such a wrong word, what the manual really meant was, a Vpot cell is counted as a channel and they really mean the hardware, not a midichannel or what so ever.
So i would need to split the hex again, left number is Vpot or channel to use. The right hex number should be the meter values. We can use a range of 0-C, and bind that to any paramter that is desired. If velocity is in question, then of course it needs to be converted, so that the output are aftertouch values from 0-C. This is quite a range. So we have 12 steps of the meter in a 0-128 range. Just like the LED rings, but better :smiley: . Sometimes place is short on the display and you can use metering to show values, instead of using three digits to show them. Often values have no meaning. It is just a number that represents a min.-max. range. You can even use the meter for showing positive and negative values, So you can use metering for these kind of things, which is like i said, really nice to have. Very handy, if you play a note and instantly see, how it affects the sound/patch. The splitting is not the problem, but getting those values together again, is always something i struggle with. For example i have fully working Feedback, whenever i use the A-Station, but sending out the proper values from the C4 to the A-Station again, is a problem for me. The switches are one example of this. I should have done those switches better :smiley: .

Today i will attach some spreadsheets about the C4, so everybody can check, which button sends what etc. Also a ASCII character sheet that represents one display and the offset that is used for showing values at ‘the right channel’ :smiley: and i will do some cleaning of the project, before going to the next page.

At the end i am really excited about MTP, it is so fast and the panel is very responsive. I had two software panels before, but they struggle, have micro stuttering and such. And your blink project is a good example for how fast and responsive MTP delivers. Really cool.

For all the parameters, i will use the levels for sure :smiley: :blush:


In vertical mode, you can use 10 letters at least (top and bottom line of the display), for a parameter name in a Vpot cell. easy :smiley: and for these cases, the levels are pretty accurate and work well. And yeah, the A-Station has a internal midiclock: LFO Sync Internal – MIDI Clock. Pretty much can be synced: LFOs, Arpeggiator, Chorus Phase, Panning, Delay, EQ Filter :smiley: . Ha, and it can be triggered/set. Perfect.


Looks like you are having way too much fun :grinning:

Steve Caldwell
Bome Customer Care


Also available for paid consulting services: bome@sniz.biz