I have an AKAI apc mini ii I’ll be using for shortcuts to control photoshop, lightroom, and premiere. Is there an easy way to set custom colors to all drum pads and have them blink a color when pressed? I know how this works but that’s a lot of programming and wondering if there’s an efficient way to set it up and how to send that first message to ‘turn on the lights’ after I plug it in to work.
Hi and welcome to the Bome community!
Well for a newbie, I’m not sure how ‘easy’ it is but I came up with the below method.
I create a bitmap of 64 two state buttons and keep track of them in two global variables ‘g0’ and ‘g1’.
Then as I push a button, I look at the bitmap and toggle it’s state. The trick here is to iterate through the bitmap every time a button is pushed to update all 64 LED states.
On project open I set all LED’s to the default ‘off state’. In this case, I’m using bright blue.
This post shows you the color map for the APC MINI MKII.
The timer ‘Matrix Timer’ looks at each bit and determines the on color and off color along with its brightness or flash state. This is done in translator 1.1. (Preset 1 translator 1)
Here are the rules of that translator. You can change the value of qq for the color and oo for the brightness (or blink)
gc=gc-1
pp=gc


// which global variable
if pp>31 then uu=g1
if pp<=31 then uu=g0
// iterate through bitmap to determine button state
tt=uu>>pp
tt=tt&1

// for colors see
// https://forum.bome.com/t/new-akai-pro-apc-mini-mk2-initial-led-mapping-summary/4752

// note off color 41 is blue
qq=41
// note on color 72=red
if tt==1 then qq=72

// intensity or blink
// bright
oo=6
// blink
if tt==1 then oo=7

oo=144|oo
For manipulating the LED state with buttons, I use translator 1.0 which basically sets or clear the bit and the runs the timer again iteration through all 64 LEDs.
Here are the rules. You probably would only need to change theses if you want different button behavior.
// only notes 0-63 which is the LED matrix

if pp>63 then exit rules, skip Outgoing Action

//which global variables
if pp<32 then uu=g0
else uu=g1

// manipulate bit
tt=uu>>pp
tt=tt&1
if tt==0 then Goto "set"
else Goto "clear"
// failsafe
exit rules, skip Outgoing Action

Label "set"
rr=1<<pp
uu=uu|rr
Goto "done"

Label "clear"
rr=1<<pp
rr=rr^-1
uu=uu&rr

Label "done"

// put back into global variable
if pp<32 then g0=uu
else g1=uu

// set iteration timer
gc=64
Note also at project initiation, the timer is set to run, so when you start up the project all buttons should be blue.
Global variables in this project are defined in the rules of translator 0.2. I like to keep track of global variable in one place.
For sending MIDI to the application, I’ve set the following MIDI through route. There is not translation here.
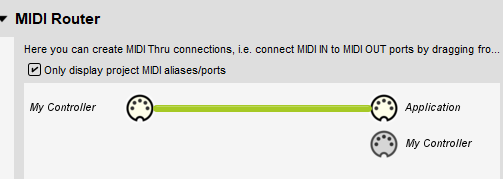
Here are how my aliases are set up.
You can learn more about aliases from this tutorial.
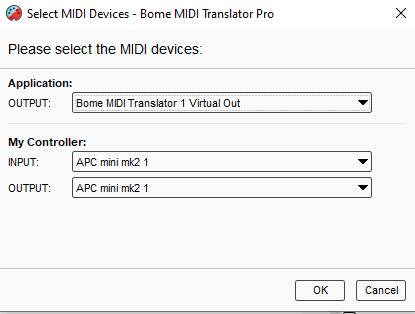
Midi input and output port selection is done at the preset level.
For more information about device selection, see this tutorial.
Attached is you project file. You should only need to change rules of translator 1.1 if you want different colors.
Also I did not set up LED control for bottom or side buttons.
APC-MINI-Toggle-Matrix-2024-10-21.bmtp (3.4 KB)
Steve Caldwell
Bome Customer Care
Also available for paid consulting services: bome@sniz.biz
Wow thank you for that work and detailed response! So it reads from a literal bitmap image (I can easily make this 15 years in photoshop) or is bitmap a term used more loosely? I want certain rows to have custom colors that correspond to different adobe programs. I’ll be purchasing BMT this week and trying this out.
You can set up rules for each note number to have different on and off colors depending on the note number. That would be done in the timer.
Steve Caldwell
Bome Customer Care
Also available for paid consulting services: bome@sniz.biz
I purchased BMTpro today! Question regarding previous conversation - is there a script that will send a midi note to the mini2 with the same midinote (causing that drumpad light to change color temporarily but with a custom veolocity and channel? Like sample the incoming note and send a signal to that same note?
2 other questions - are scripts per translator? As in I’ll have to paste the script multiple times or are they global?
Also if I’m doing mini2 to adobe software what are outputs and virtual ports? Do I need them?
Thanks for your purchase!
Yes, but we don’t call it a ‘script’. We have ‘translators’ that can do simple translation. We have ‘rules’ that can manipulate the incoming data and send or process the manipulated data. The rules are within each translator and you can interact with other translators by passing global variables between them. Translators can also have up to 10 local (private) variables if the processing needs to happen within the translator itself.
This depends on which Adobe Software. Most of it does not understand MIDI so you would have to rely on keystroke (i.e. keyboard shortcuts) or mouse outgoing actions. Some of the software like Adobe Premier has limited MIDI (like Mackie MCU) support for a small subset of functions. See this tutorial create back in 2017.
Steve Caldwell
Bome Customer Care
Also available for paid consulting services: bome@sniz.biz
Thank you for that! I just learned how to set global variables. I have a translator up top that does nothing with in/output but sets global variables of colors (PS for photoshop, LR for lightroom, and PR for premiere. I have groups of rows dedicated to each program with their own color set by the global variables so I can change them later if I want.
How would you suggest me handle the ‘default color’ and the push color? It’s not a must have of course. I have the default colors sent to all buttons upon project load. But does each button then need a on translator for the push color AND an off translator to revert to default (unpushed) color? And yes these are all used as keyboard shortcuts. Faders I have working with Lightroom via a program called ‘Midi2LR’ that works great. Not sure I’ll have the luxury of fader input control in PS, we’ll see when I get to that stage.
Hi,
I usually have a single translator with different on and off colors depending on the incoming note.
In this example, I used math to determine which group a given button falls under and set the on-off colors based on the group assigned. I also set up logic so that only one button within a group could be on at a given time.
Steve Caldwell
Bome Customer Care
Also available for paid consulting services: bome@sniz.biz
Sorry, actually I did not create the example unless it was done somewhere else because it was beyond the scope of free support.
Steve
You may use this as a simple example.