NanoKontrol - multiple scenes

I want to create multiple scenes for my Korg NanoKontrol2 effectively doubling the number of control buttons. Similar to ‘scenes’ on NanoKontrol mk1.
DAW = MainStage on OSX.
On the Nano, the 5 transport buttons can glow. I will use transport buttons 1&2 to represent scene 1&2.

Scene 1
Press transport << CC#43, make it glow, switch to Scene 1, where other CC’s go through on midi channel 1 (as normal).

Scene 2
Press transport << CC#44, make it glow, switch to Scene 2, where other CC’s go through on midi channel 2.

(this part is working well thanks Steve, feel free to upload the project thus far).

Nano buttons LED’s
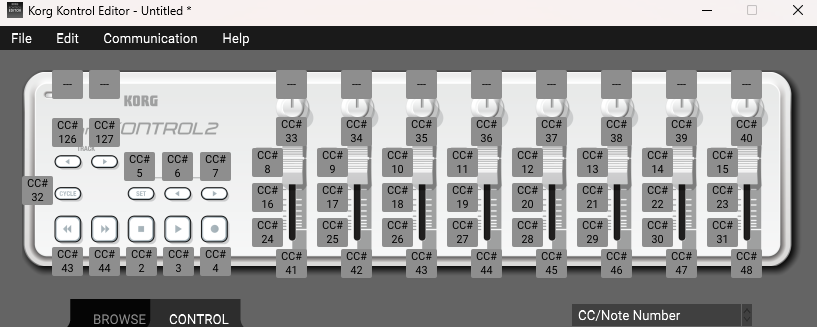
Nano has 8x3=24 buttons x 2 scenes = 48 LED’s to keep track off.
Plan is to use 48 variables to store these LED values.
Scene1:Fader 1 has 3 buttons (CC#20,30,40), to be stored in var: r1,s1,t1.
Scene2:Fader 1 has 3 buttons (CC#20,30,40), to be stored in var: x1,y1,z1.

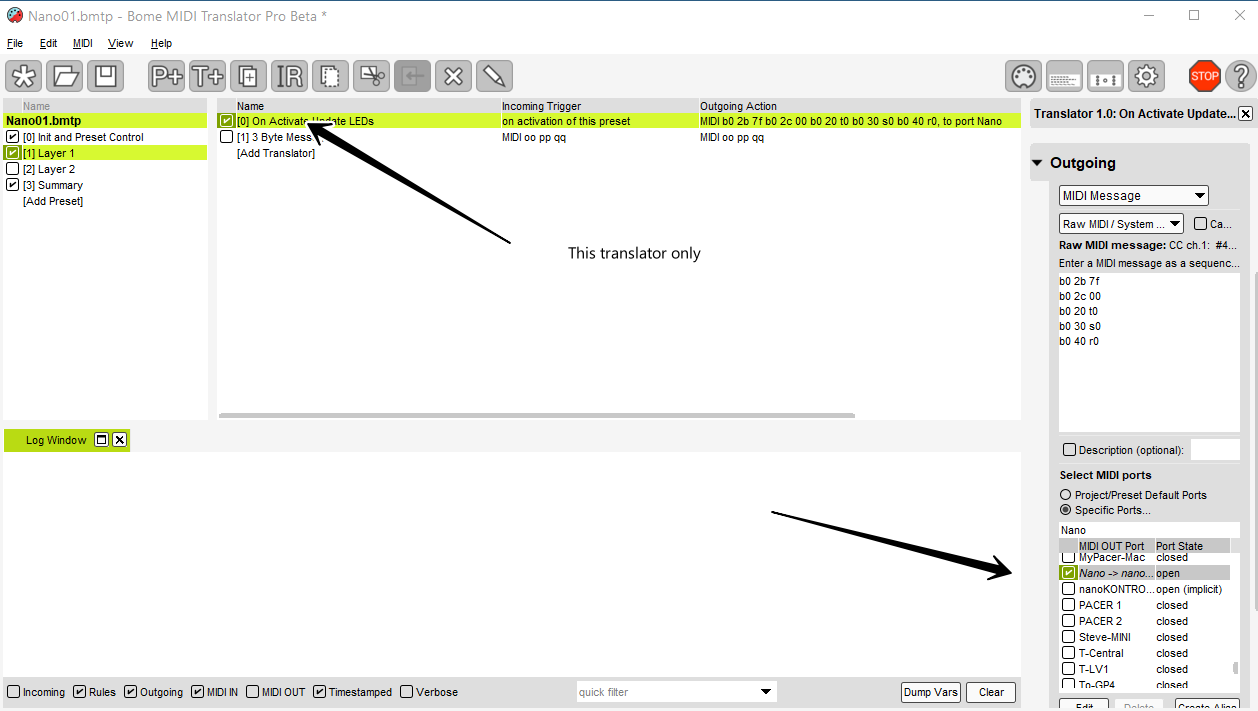
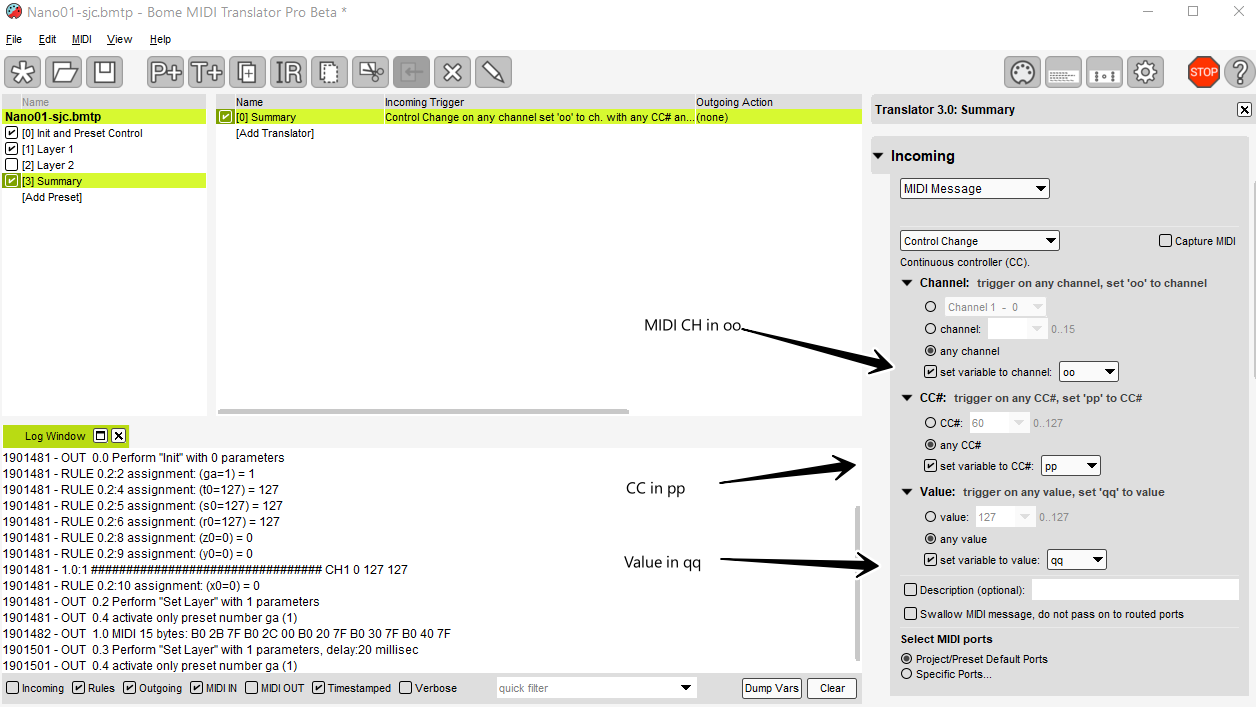
Translator successfully lights these buttons, based on the vars, using this Outgoing MIDI Message | Raw Midi code:
b0 20 t1
b0 30 s1
b0 40 r1

Capture button changes
Next part is to capture CC messages, so that when a button is pressed on Nano or MainStage, I need to capture the new glow setting in the variable, so that I can set all the LED’s correctly, each time the scene changes.

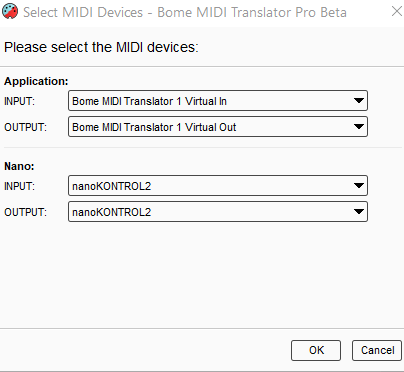
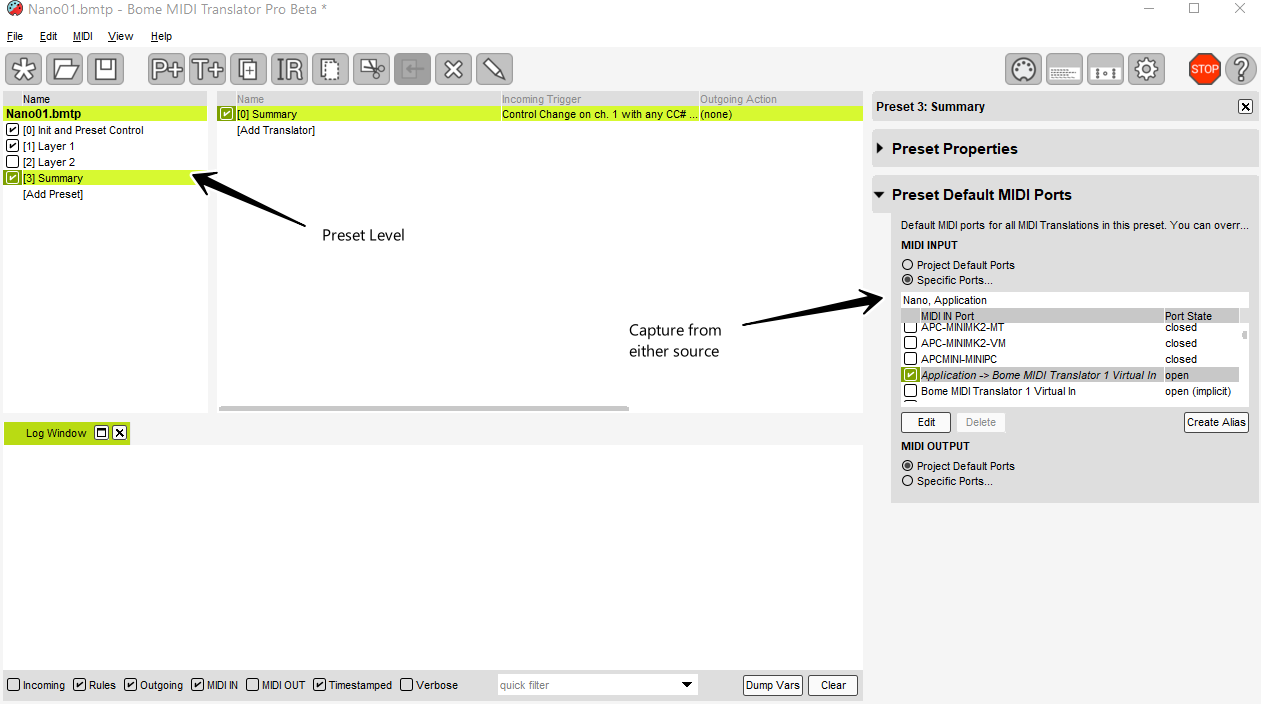
Under Project > MIDI Ports, I have ticked all MIDI inputs and outputs.
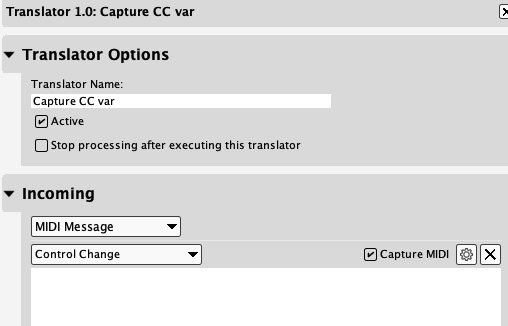
Translator (is active) > Incoming (MIDI Message, Control Change), TICK=Capture MIDI

When I press buttons on the Nano, and in MainStage, I don’t see the midi data in this box (although I do see midi data in the Log window).
Any ideas to fix that?
EDIT: Restarting the project fixed it.

Capture fails

Current project file.
Three buttons CC#20,30,40, are holding vars t0,s0,r0, that part is working.
Seems like I’ll need to create 48 Translators to handle the 8x3x2(scenes) inputs & vars?

Nano01.bmtp (4.8 KB)

Hi,

First of all, you should set up aliases for your application, similar as you did for your nanoKontrol2.

Here is how I set mine up:

image

You can learn more about aliases from this tutorial.

Then you should set up device selection at the preset level to ensure you MIDI messages are only recognized from the desired input device and only go to the desired output device.

Layer 1 and Layer 2 preset selection should be set up for input as Nano and output as Application.

Here it is how I set it up for Layer 1

Then for layer level local LED feedback you should override the preset level with the translator so that the output only goes back to your nanoKontrol.

For more information about device selection, see this tutorial.

Then you can capture MIDI message from both directions in a different preset with input from either application. I set up capture from your ‘Summary’ preset in this manner. Your translator there should populate the proper global variable based on the input CC number.

In the translator, use local variable to capture the values and then based on the CC number store them in the correct global variable. In my case I’m capturing the MIDI Channel in the local variable oo, the cc number in local variable pp and the value in local variable qq.

The structure of the rules would look something like this to store in a given variable. You will need to set up global variables for each layer as they will likely be unique.

// Determine Layer by MIDI channel
if oo==1 then goto "Layer2"


// Store layer 1 into local variable

if pp==32 then t0=qq
if pp==48 then r0=qq
if pp==64 then s0=qq

goto "Done"

Label "Layer2"
if pp==32 then t1=qq
if pp==48 then r1=qq
if pp==64 then s1=qq


Label "Done"

Now you actually will not need so many global variable since buttons have either an on or off state and a global variable is 32 bits and can map up to 32 buttons if you use a bitmapping technique as described here. If you do this, only 2 global variables will be needed to map all of your buttons and then us the full global variable for the 8 knobs and 8 faders. You may not need to map the knobs and faders because you cannot actually update them remotely anyway.

Here is the updated project file but you will still need to add to it.

Nano01-sjc.bmtp (5.5 KB)

Steve Caldwell
Bome Customer Care


Also available for paid consulting services: bome@sniz.biz

Thanks.

When I launch your project, it prompts to Select MIDI Devices. How do you make it prompt like that?
EDIT: I see. If you map Alias=Device, then it prompts for me to remap that Alias.

Your project is not quite working for me, led’s not activating correct state when flicking back to Scene1.

Should I have [Init] > [Capture] translator disabled, since we are now doing that in the [Summary] preset?

For clarity, in Korg Kontrol Editor, my Nano buttons are set Momentary (not Toggle). Momentary sends 127 on press, and 0 on release.

Also, I test with Mainstage open, and the 8x3 buttons mapped in my MS project, because I find that the buttons stick better with MS open, and I think Mainstage likes to be in charge of led state, and I need to confirm that led states are also correct in MainStage. Or do you think it is better to close MainStage, and make it work correctly just with the Nano?

I think MainStage needs to be the master LED controller, and BMT listens to CC changes and records values into variables, and only sets LED lights when changing scenes.

Yes, by creating the alias, it will prompt you upon opening if it is undefined.

I’m attaching a later project that maps your initial LED’s along with all of the 24 channel LEDs using bitmapping and two global variables. I did not map your other side LED’s.

You must pay close attention to this tutorial to see how device input and output mapping works. In some cases you want the input only from your application. In some cases you only want input from your controller. The same is true for output.

Attached is the nanoKontrol2 definition file I used. You must load it using your Korg Kontrol editor. The channel buttons (Solo,Mute,Record) in my project file are mapped to the definitions of this file, so it will not work if you don’t have this mapping.

Steve-2024-07-19.txt (403 Bytes)

You must rename it from a “.txt” extension to “.nktrl2_data” extension before loading it in your editor.

And here is the updated project file.

Nano01-sjc-a.bmtp (9.4 KB)

For buttons pushed on the nanoKontrol2 the global variables are handled as toggle. For feedback from the application they are handled as 0x7f for on and 0 for off.

It might be that you don’t need to capture data from your NanoKontrol2 if your DAW is sending feedback anyway. If this is the case, you can disable translator 3.1.

Explaining each translator would take a while so I suggest you study it closely. I added comments throughout the rules to explain what I’m doing.

If you need customized support for this project, I am available for paid consulting/programming services. Simply DM or email me.

Steve Caldwell
Bome Customer Care


Also available for paid consulting services: bome@sniz.biz

That is working nicely thanks (with MainStage closed).

Summarising my Alias & Port settings:

Define Aliases (Project > Default MIDI Ports)
Bome:Input = Bome MIDI Translator 1 Virtual In
Bome:Output = Bome MIDI Translator 1 Virtual Out
Nano:Input = nanoKontrol2
Nano:Output = nanoKontrol2

Map Ports at each level
Project: In=Bome+Nano. Out=Bome+Nano
Init: (Use Project defaults)
Scene1 In=Nano Out=Bome (to hear buttons)
Scene1 > LEDs: In=Preset Out=Nano (to push LED’s)

Thanks, it’s nice to now be able to analyse the logic while it is working thanks!!

1 Like